
Thinking about going solar and tackling the wiring yourself? It’s an exciting project that can save you money while making your home more energy-efficient, but it’s not as simple as just connecting a few wires. DIY solar wiring requires careful planning, the right tools, and a good understanding of electrical systems to ensure safety and efficiency. But don’t worry—by learning the basics and following best practices, you can successfully wire your solar system and enjoy renewable energy at home. Let’s dive into what homeowners need to know with the help of Leaf Power Design.
From choosing the right gauge of wire to understanding inverters, charge controllers, and battery connections, every detail matters. Whether you’re going the DIY route or considering professional residential solar wiring services, proper installation is crucial. Mistakes can lead to power loss, fire hazards, or even damage to your expensive solar panels.
Understanding the Basics of Solar Wiring
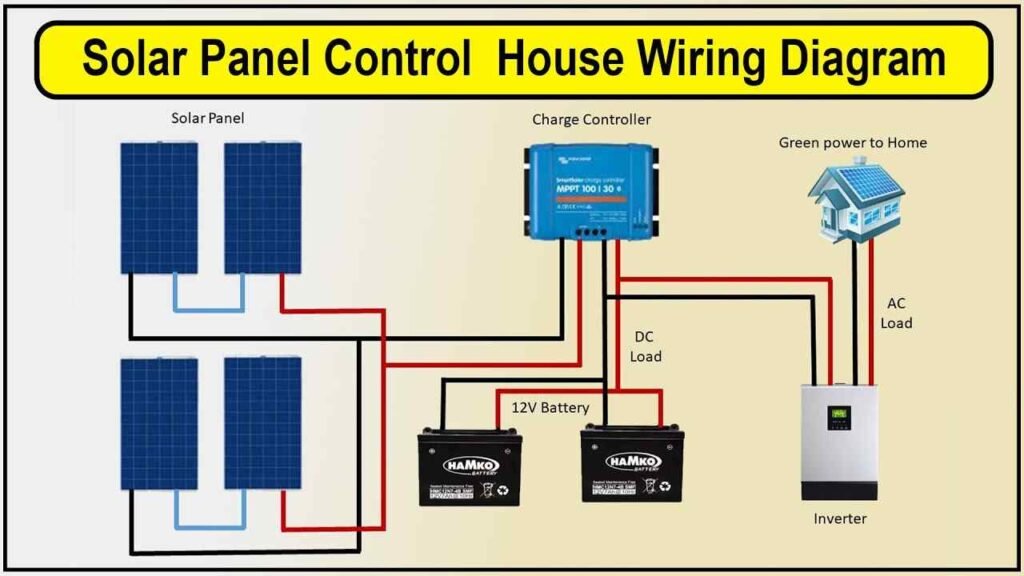
Solar wiring is the backbone of any residential solar system, ensuring that energy flows efficiently from your panels to your home. It involves connecting solar panels to an inverter, charge controller, and battery storage (if applicable) to create a safe and functional system. Understanding concepts like direct current (DC) and alternating current (AC) is essential, as solar panels generate DC power, which must be converted to AC for household use. Additionally, knowing the difference between series and parallel wiring impacts the system’s voltage and current output. Proper grounding is also critical to prevent electrical hazards. Before starting, homeowners should research local electrical codes and safety guidelines to ensure compliance and efficiency in their solar wiring setup.
Essential Tools and Materials for DIY Solar Wiring
Before starting a DIY solar wiring project, gathering the right tools and materials is crucial. Essential tools include wire cutters, crimping tools, a multimeter for testing voltage and current, and a drill for mounting components. Materials such as solar cables, MC4 connectors, fuses, circuit breakers, and a junction box are necessary for safe and efficient connections. Choosing high-quality, weather-resistant wiring ensures durability, especially for outdoor installations. A reliable charge controller and inverter are also key components that regulate power flow. Additionally, safety gear like insulated gloves and goggles is vital to prevent electrical shocks or injuries. Having the right tools and materials from the start will help homeowners complete their solar wiring project smoothly and safely.
Choosing the Right Gauge of Wire for Your Solar System
Wire gauge plays a critical role in the efficiency and safety of your solar system. The thickness of the wire determines how much current it can handle without overheating or causing voltage drops. Thicker wires (lower gauge numbers) are better for higher current loads and long distances, while thinner wires (higher gauge numbers) are suitable for short runs with lower currents. Common wire gauges for solar installations range from 10 AWG to 4 AWG, depending on system size. Using the incorrect wire size can lead to power loss, inefficient energy transfer, and potential fire hazards. To determine the right gauge, homeowners should calculate voltage drop and current flow, ensuring their system runs at peak performance without electrical risks.
How to Properly Connect Solar Panels
Connecting solar panels correctly is essential for maximizing energy efficiency and safety. Panels can be wired in series, parallel, or a combination of both, depending on the desired voltage and current output. In a series connection, the voltage increases while the current remains the same, making it ideal for high-voltage systems. Parallel wiring, on the other hand, keeps the voltage constant while increasing the current, which is useful for systems requiring more amperage. Securely attaching MC4 connectors ensures a stable connection between panels. Proper grounding of the panels protects against electrical surges and lightning strikes. Before finalizing the setup, using a multimeter to test voltage and current output ensures the system is correctly wired and functioning efficiently.
The Role of Charge Controllers in Solar Wiring
A charge controller is a vital component in a solar system that regulates the voltage and current flowing from the panels to the batteries. Without it, excessive power could damage the battery bank, leading to reduced efficiency or system failure. There are two main types: PWM (Pulse Width Modulation) and MPPT (Maximum Power Point Tracking). MPPT controllers are more efficient as they optimize energy transfer, especially in variable sunlight conditions. Properly wiring the charge controller involves connecting it between the solar panels and the battery system, ensuring it matches the system’s voltage requirements. Selecting the right charge controller protects batteries from overcharging, extends their lifespan, and ensures the entire solar setup operates safely and efficiently.
Inverters: Converting Solar Power for Home Use
An inverter is essential for converting the direct current (DC) power generated by solar panels into alternating current (AC), which is used by household appliances. There are three main types: pure sine wave, modified sine wave, and grid-tie inverters. Pure sine wave inverters provide the highest quality power and are recommended for sensitive electronics, while modified sine wave inverters are a more budget-friendly option. Grid-tie inverters allow homeowners to connect their system to the utility grid, feeding excess power back to the grid. Proper wiring ensures stable energy conversion, prevents power loss, and enhances system performance. Choosing the right inverter based on system size and energy needs is crucial for a reliable and efficient solar power setup.
Battery Connections and Storage Safety Tips
For homeowners using battery storage, proper battery connections are essential for safe and efficient energy storage. Batteries can be wired in series to increase voltage or in parallel to increase capacity, depending on energy needs. Using high-quality cables and connectors prevents energy loss and overheating. A battery management system (BMS) helps regulate charging and discharging, protecting against overvoltage and deep discharge. Ensuring batteries are stored in a well-ventilated, temperature-controlled area minimizes risks of overheating or gas buildup. Proper insulation and securing connections reduce the chance of short circuits. Regular maintenance, including checking connections and monitoring charge levels, extends battery lifespan and ensures continuous energy availability from the solar system.
Common Mistakes to Avoid in DIY Solar Wiring
DIY solar wiring can be rewarding, but certain mistakes can lead to inefficiency or safety hazards. Using the wrong wire gauge can cause overheating and voltage drops, reducing system performance. Poorly secured connections may lead to energy loss or electrical fires. Incorrectly wiring batteries can result in overcharging or insufficient power storage. Skipping essential safety measures like grounding and fuses increases the risk of electrical faults. Failing to follow local electrical codes can lead to compliance issues and potential fines. To avoid these mistakes, homeowners should carefully plan their system, double-check connections, and use high-quality components. Seeking professional guidance when needed ensures a safe and effective solar installation.
Ensuring Safety and Compliance with Electrical Codes
Adhering to electrical safety standards and local building codes is crucial for a secure solar installation. Electrical codes specify wire sizing, grounding requirements, and installation methods to prevent hazards like fires and electrical shocks. Homeowners should check with their local authorities for specific guidelines before starting their project. Using circuit breakers and fuses protects against power surges and short circuits. Proper insulation and weatherproofing of outdoor connections prevent damage from moisture and extreme temperatures. Installing a disconnect switch allows safe system maintenance. Following National Electrical Code (NEC) guidelines ensures the system meets safety standards, making it legally compliant and reducing the risk of malfunctions or hazards.
Troubleshooting Solar Wiring Issues
Even with careful installation, solar systems can experience wiring issues that affect performance. Common problems include loose connections, damaged wires, or faulty inverters. If panels are not generating expected power, checking for voltage drops or incorrect wiring configurations can help identify the issue. A multimeter is useful for testing connections and ensuring proper current flow. Corrosion on terminals can lead to poor conductivity and should be cleaned regularly. Battery-related issues, such as inconsistent charging, may indicate a faulty charge controller or improper wiring. If troubleshooting doesn’t resolve the problem, consulting a professional can help diagnose and fix complex issues, ensuring the solar system operates efficiently.
When to Hire Professional Residential Solar Wiring Services
While DIY solar wiring is possible, hiring professional residential solar wiring services is often the best choice for safety and efficiency. Professionals ensure correct wire sizing, proper grounding, and compliance with electrical codes. They have the experience to design and install systems tailored to your energy needs, minimizing risks of power loss or hazards. If the system requires complex configurations, such as hybrid setups with battery storage, expert installation is highly recommended.
Conclusion
DIY solar wiring can be a rewarding project, offering homeowners energy independence and long-term cost savings. However, it requires careful planning, the right tools, and a solid understanding of electrical components to ensure efficiency and safety. From choosing the correct wire gauge to properly connecting inverters, charge controllers, and batteries, every detail impacts performance. While troubleshooting common issues can help maintain system functionality, compliance with electrical codes is essential to avoid hazards. For complex setups or grid-tied systems, hiring professional residential solar wiring services ensures a seamless and safe installation. Whether you choose the DIY route or seek expert assistance, a well-wired solar system can provide reliable, renewable energy for years to come, making your home more sustainable and cost-efficient.
FAQs
Can I wire my solar system myself, or should I hire a professional?
You can wire your solar system yourself if you have electrical knowledge, but hiring professional residential solar wiring services ensures safety, efficiency, and compliance with local codes.
2. What happens if I use the wrong wire gauge in my solar setup?
Using the wrong wire gauge can cause overheating, voltage drops, and inefficiency, potentially leading to power loss or fire hazards.
3. How do I choose between series and parallel wiring for my solar panels?
Series wiring increases voltage while keeping current the same, while parallel wiring maintains voltage but increases current, depending on your system’s energy needs.
4. Do I need a charge controller for my solar system?
Yes, a charge controller regulates power flow to prevent battery overcharging and extend battery lifespan, making it an essential component.
5. How can I troubleshoot common solar wiring issues?
Use a multimeter to check voltage, inspect connections for corrosion or loose wires, and ensure your charge controller and inverter are functioning correctly.